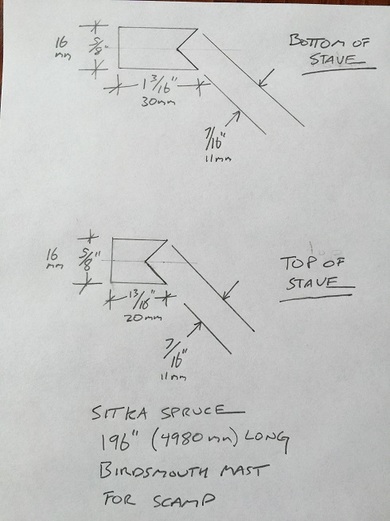
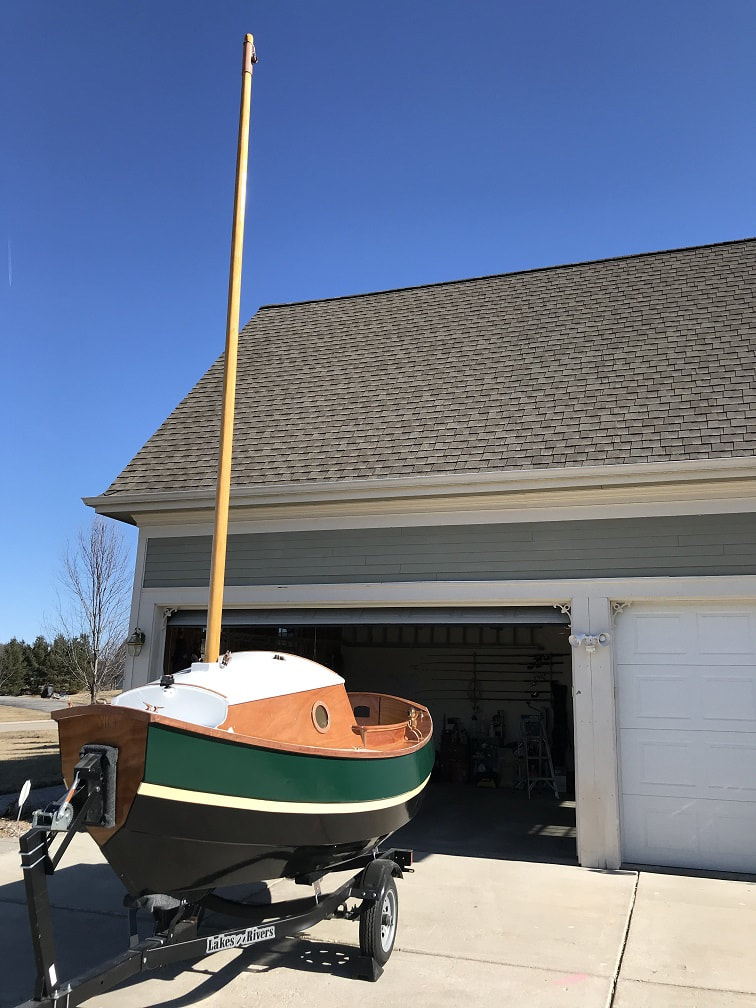
SCAMP ARGO's Birdsmouth Mast is made from Sitka Spruce. Construction photos below.
The plans call for a hollow wooden mast made using "birdsmouth" joints. It makes for a strong, light, and quite pretty mast. The hollow design minimizes weight aloft and makes stepping the mast easier due to the overall lighter weight. The joint looks complicated, but I think it will be worth it, and also not too difficult, so I will go for it. Tools required are: surface planer, a decent table saw, handplanes, good straight edges, and a nice area to work on pieces that are over 16' long. If you don't have a surface planer, I imagine you could take your boards to lumber yard or cabinet shop to have the initial thickness-planing done. The procedure I followed is detailed below, and detailed photo's of each step are below.
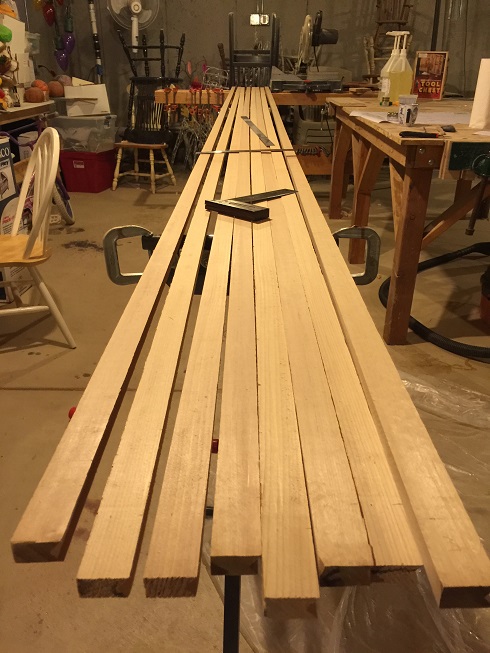
- Cut the boards to length; and I left an extra 2" longer the final length for this initial rough-cut
- Used a surface planer to plane the boards to 5/8" (16mm)
- Rip 8 staves. I ripped the rough blanks to 1 5/16" which is slightly oversize vs the finished dimension at the bottom of the mast for each stave which is 1 3/16" (30mm)
- Cut in the birdsmouth using a table saw (detailed steps below)
- Measure very precisely using stainless steel rulers and squares, and a frequently-sharpened pencil, and mark the tapers onto the staves. NOTE that the taper-rate increases near the head of the mast. The taper is not constant from base to head of the mast. I used the taper dimensions provided on the purchased SCAMP drawings and connected the dots with a fine straight 36" stainless straight edge.
- I used a saber-saw with a new sharp blade to rough-cut the tapers, and then sanded them exactly to the marked line, this worked quick and worked well. I dry fit the assembly and it looks great. Now I will not get back to this project until the weekend.
- Detailed photos of steps are below
1. First I drew a 1:1 scale drawing of the top and bottom cross sections of the staves
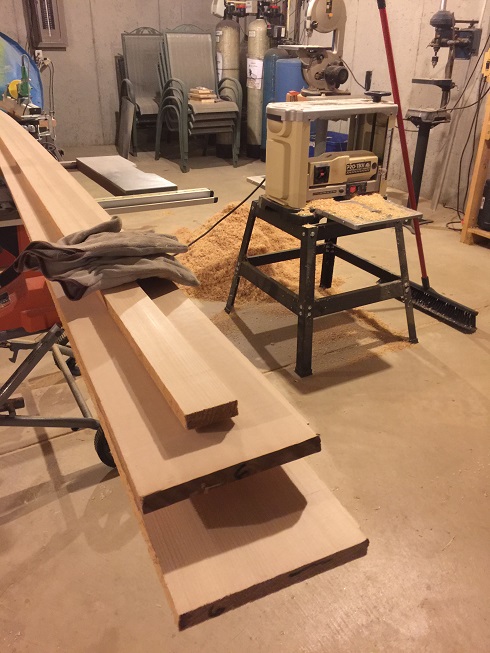
2. Then I planed the boards to 5/8" thick (16mm)
3. Boards ripped to 1 5/16" width (a bit oversize , but I will cut them to final width later)
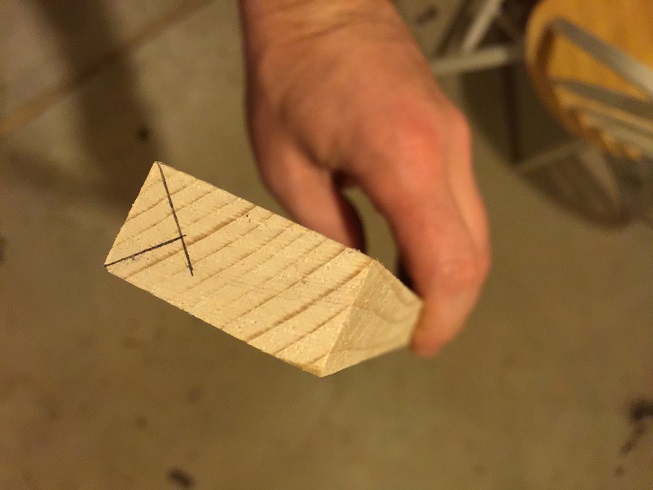
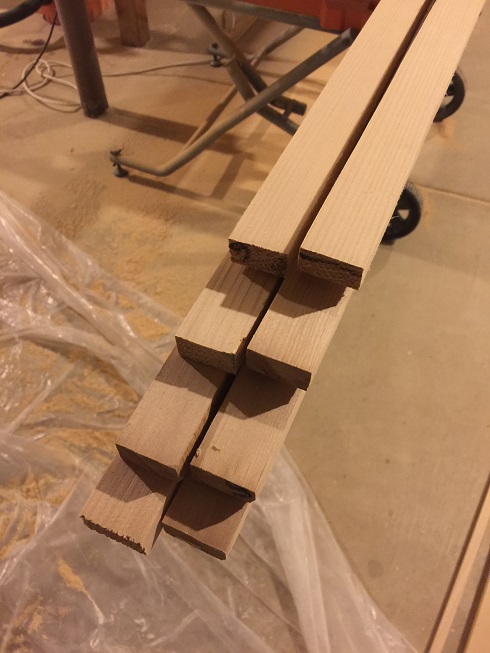
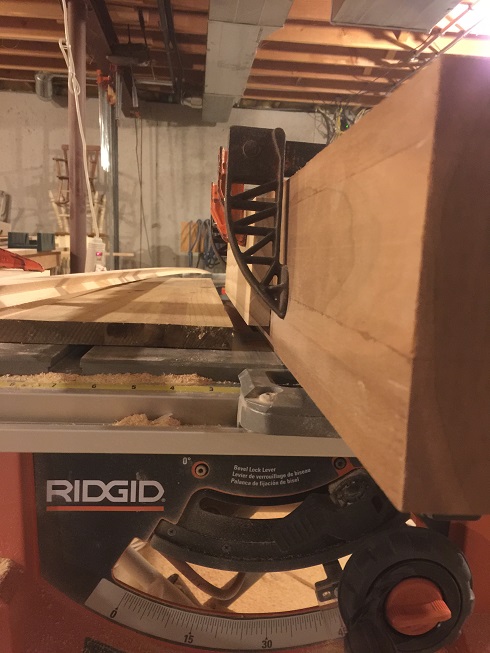
4. Cut a test piece, the exact size as the blank staves(but this test piece only needs to be 2 or 3ft long) , and mark out the birdsmouth, then set up your table saw for the first birdsmouth cut, and cut this test -piece first until the jig is set up perfectly.
5a. Tablesaw fixture for cutting birdsmouth. Straight hardwood board is clamped to the tablesaw fence so that the saw doesn't hit the metal fence. Saw tilted to 45deg and raised to the exact correct height to cut the first birdsmouth cut.
5b. Tablesaw fixture for first birdsmouth cut. Alignment boards are clamped in place to prevent the stave from moving vertically or horizontally while being cut. The first cut was made with the thin 5/8" side of the stave down, and the wide side of the stave up against the vertical fence.
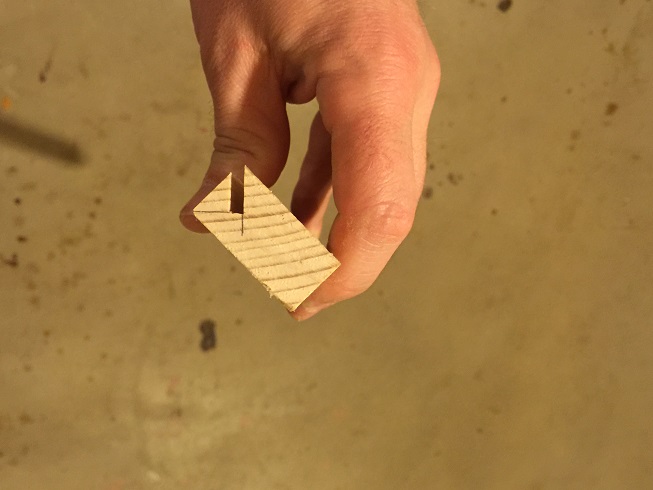
5c. Verify correct setting of the whole fixture by cutting your test-piece. Then make the first 45deg cut into all your staves.
6. Now adjust your tablesaw fixture for the second birdsmouth cut. The stave will lay with the wide side down on the second cut, as you can see in the photo. Adjust the depth of cut and fence locations and cut your test piece first to make sure it is perfect. Then cut the second cut of the birdsmouth into all the staves.
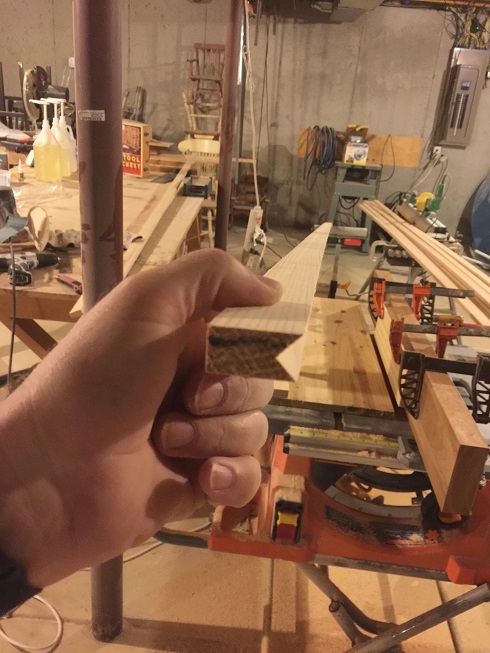
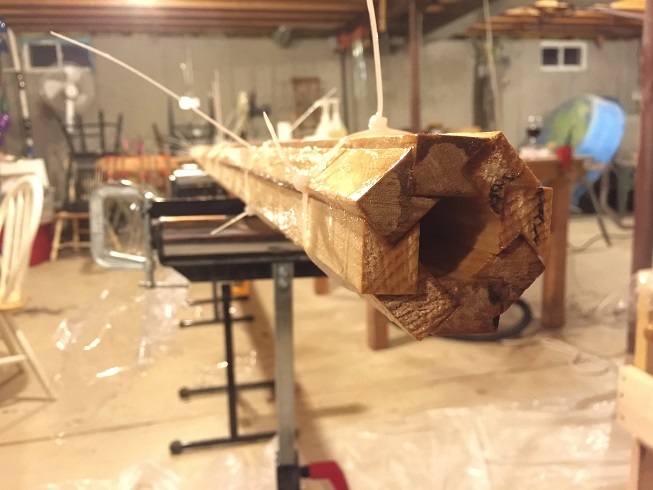
7. Completed birdsmouth. Next I will need to taper the flat edge of the staves.
8. Measure very precisely using stainless steel rulers and squares, and frequently sharpened pencil, and mark the tapers onto the staves. NOTE that the taper-rate increases near the head of the mast. The taper is not constant from base to head of the mast. I used the taper dimensions provided on the drawings and connected the dots with a fine straight 36" stainless straight edge.
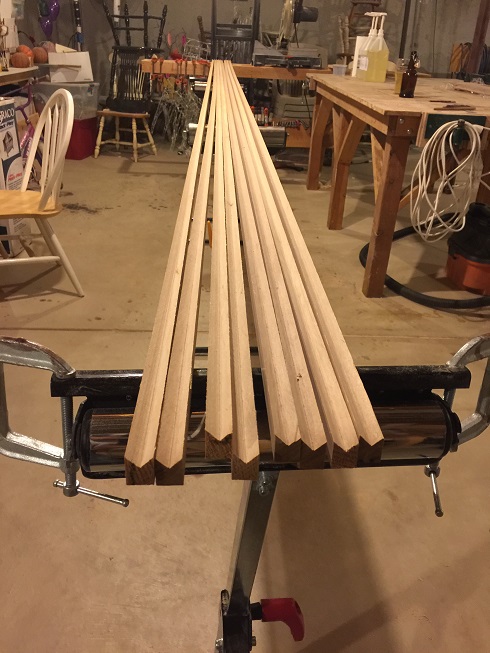
9. Used a saber-saw with a new sharp blade to rough cut the tapers, then finished up to the line perfect with a sander. Photo here is of the top end of the finished staves
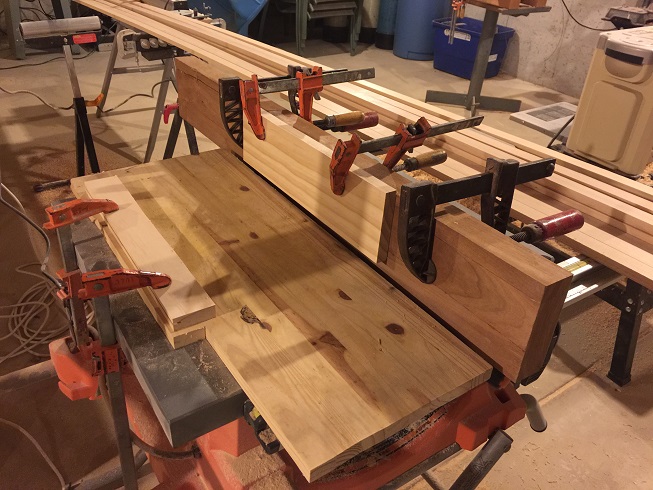
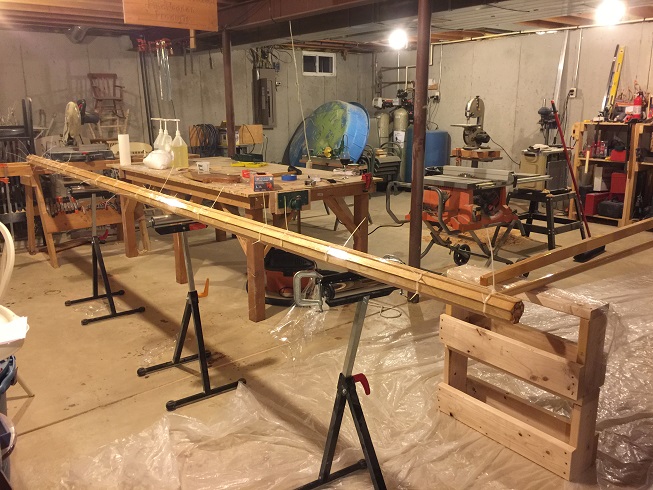
10. Rough dry-fit of the staves looks good. This was a good exercise in figuring out how to handle and assemble the pieces for the real-deal glue-up. It is tough to get all the pieces together, but once they lock up it is tight.
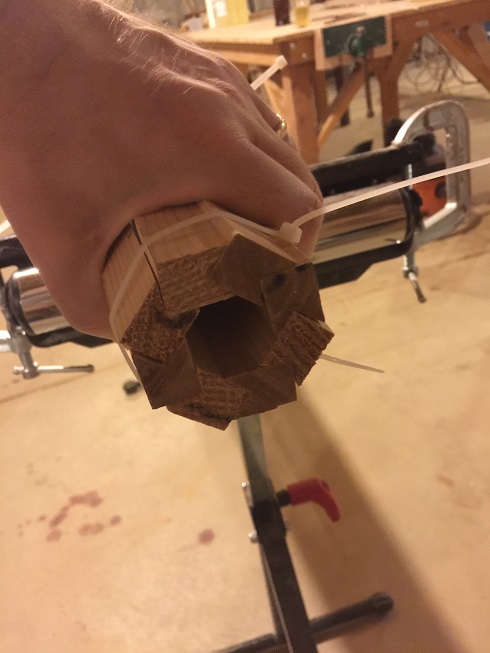
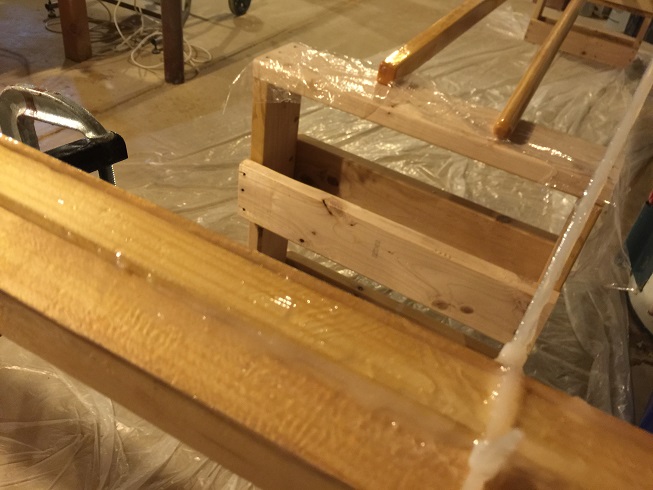
11. Mixed slow hardener epoxy and coated the birdsmouth joint and the inside of the mast staves with epoxy. Then mixed thickened epoxy slow hardener glue by adding collodial silica. Coated birdsmouths with thickened epoxy glue.
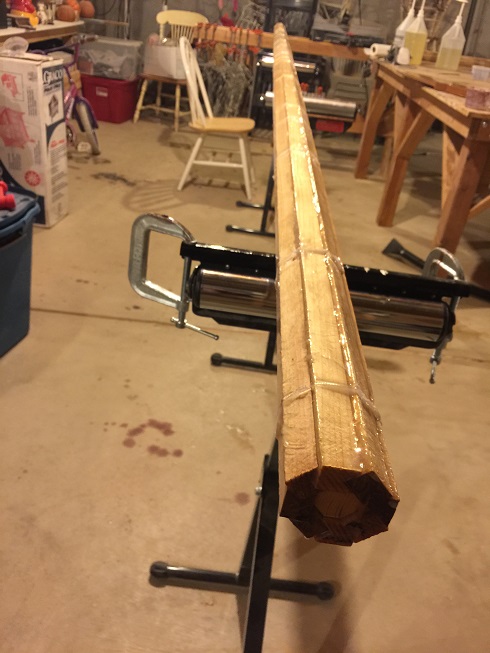
12. Enlisted my wife to help jostle the pieces together and held them in place with zip-ties. Photo above is after zip-tying the mast together. Zip ties about every foot or less. I then went over the whole mast with epoxy to fill and gaps in the joints, but I had good epoxy filling the birdsmouth so I think this will be very strong joinery.
13. Make sure enough epoxy glue is used to fill the joints and any gaps. Now I will let the mast cure for a couple days, then I will plane it round. Make sure it cures in a straight and level position with enough support to hold it straight.
I cut an end-plug about 1.5" deep and with the end-grain pointing towards the end of the mast, and epoxied it into the open end of the top of the mast. Also, the nylon straps are removed.

I used a newer cheaper jack plane to plane off the epoxy and to plane the mast to an octagonal cross section. Side-note: at sunrise the low angle of the sun in the sky lines up perfectly with this little basement window and a beam of light shines in.
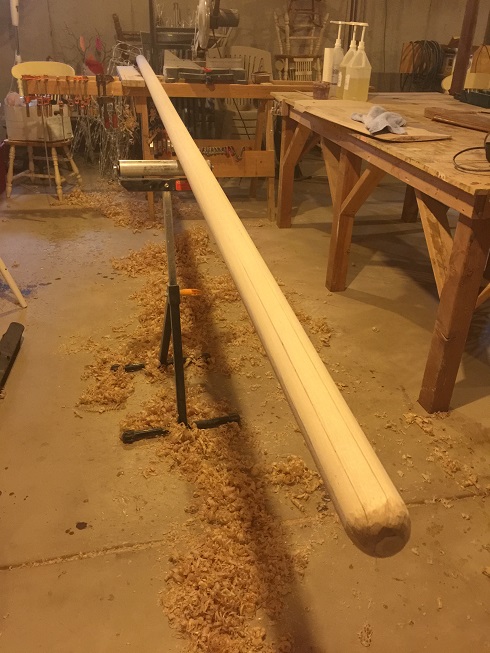
After planing the mast to 8 sides, I used my longer Miller's Falls #14 plane to take it down to 16 sides, then kept planing to round. I was pleased to see that the mast is perfectly straight and there is good penetration of the epoxy glue in the joints.

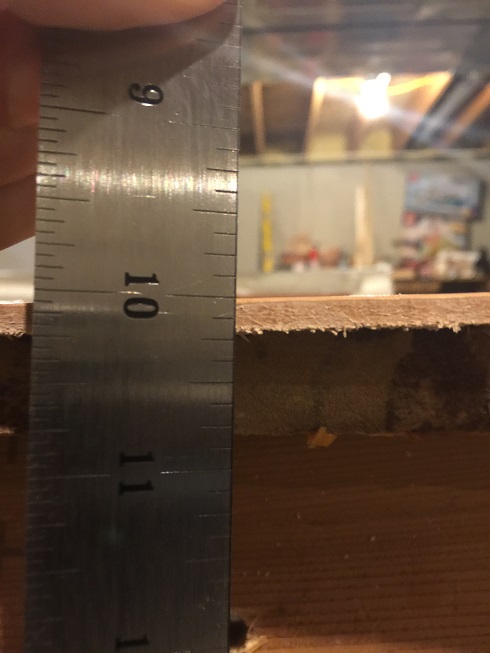
Checking for roundness and dimension, with caliper. 3" at the base, 2 1/8" at the mast head.
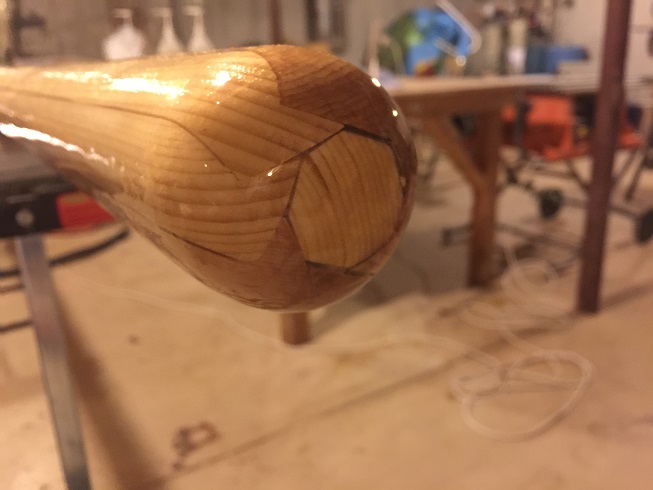
View of end plug. There were some gaps between the plug and the inside of the mast staves, as you can see, but those are filled with epoxy.
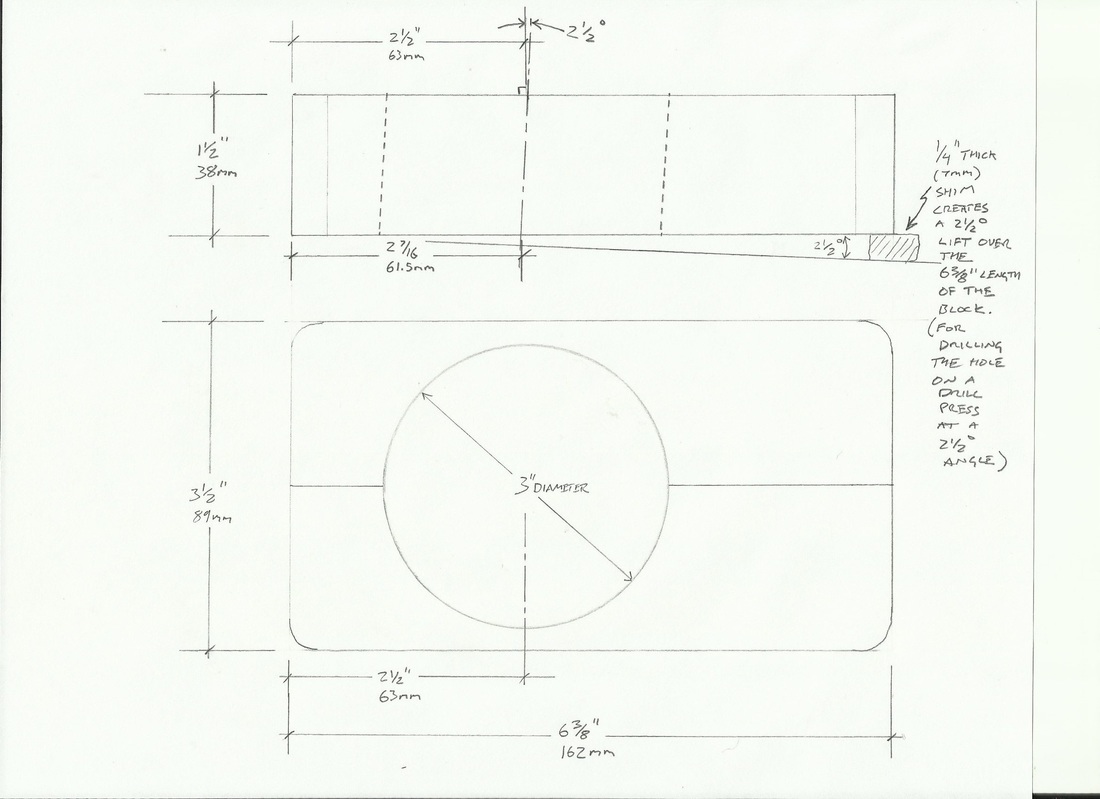
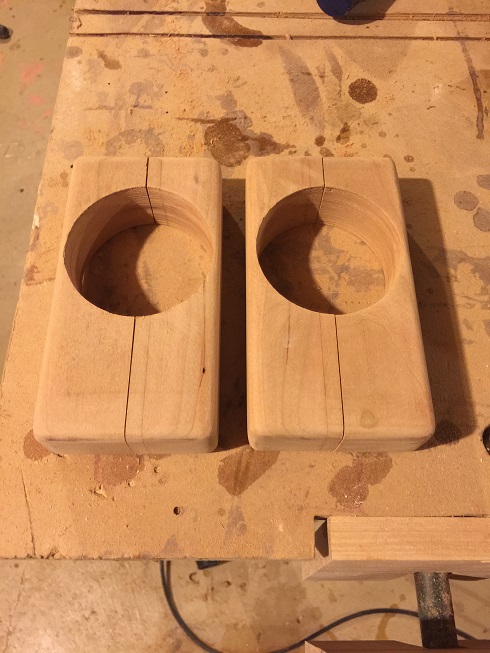
Starting the Scamp Mast Blocks. I will make them from 1.5" thick cherry, to the dimensions above. The hole will be drilled with a hole-saw and I will shim up one end of the block to achieve a 2.5deg hole angle on the drill press.
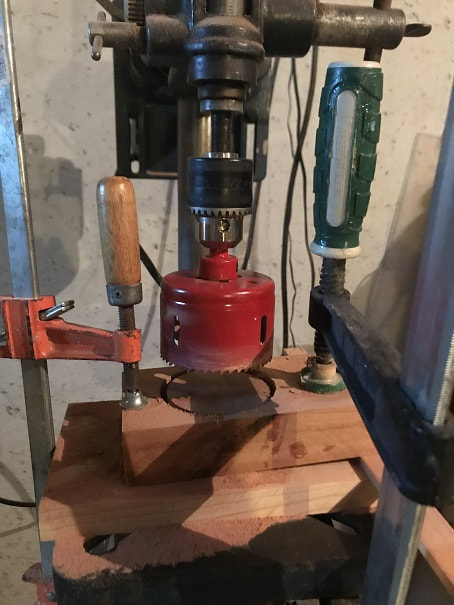
This new Milwaukee 3" hole saw cut through the cherry mast block like buttah.
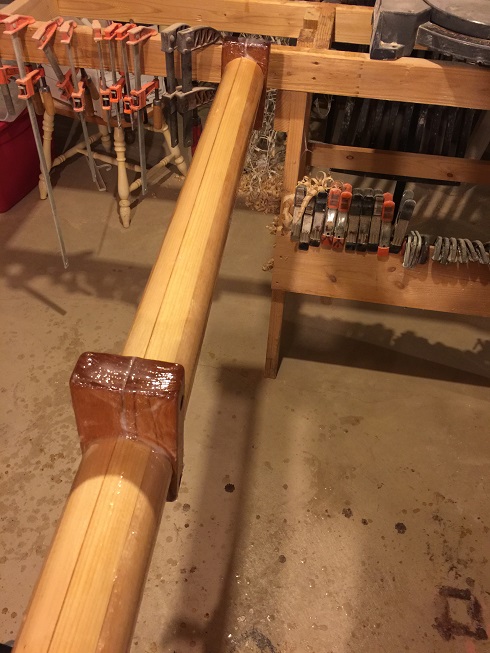
Mast blocks installed with collodial-silicon-thickned-epoxy and clamped in place with 2.5" brass screws which I will leave in-place. I was hoping for a nice wood color contrast between the cherry blocks and the spruce mast, and I am happy with it.
- Proceeded to apply 3 coats of epoxy followed by 4 coats of Epifanes high gloss spar varnish.
Leathering the SCAMP Mast
The SCAMP ARGO has 8-9oz vegetable tanned leather for chafe protection on all spars.
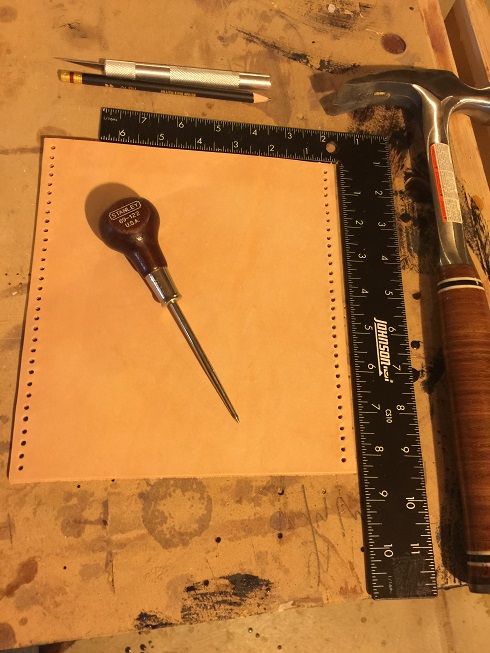
The leather is for chafe protection at the top of the mast. I will install it just below the hardware attachment point and the leather is about 8.5" long. I punched holes 1/4" apart and 1/4" in from the edge.
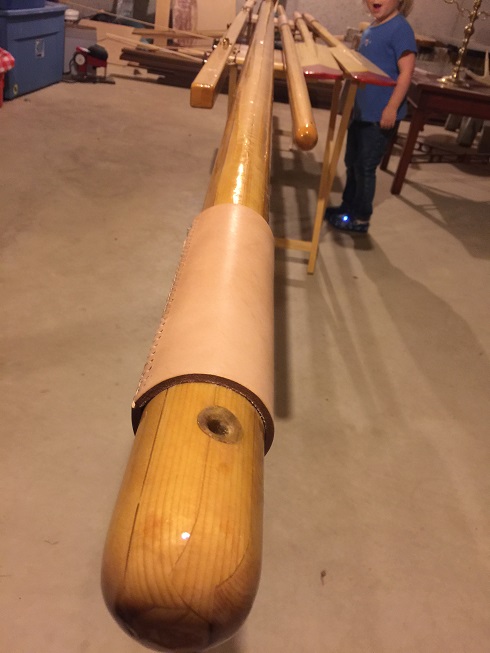
Stitched the leather on the mast using a baseball stitch, sewing palm, and 0.8mm 3 strand waxed heavy sail thread.
- I bored a 3/8" diameter hole in a short length of hardwood 3/4" dowel. Then I drilled a 3/4" hole in the top of the mast and epoxied this bored-hardwood-dowel into the mast. Epoxied the dowel inside and out. This 3/8" hole through the mast will be used to attach the halyard block and to provide an attachment point for topping lift/lazy-jacks.

Yard halyard block is made by Tufnol and is lashed/siezed to the top port side of the mast with 3/16" and 1/8" Dyneema. a bronze eye-strap is installed for the topping lift.
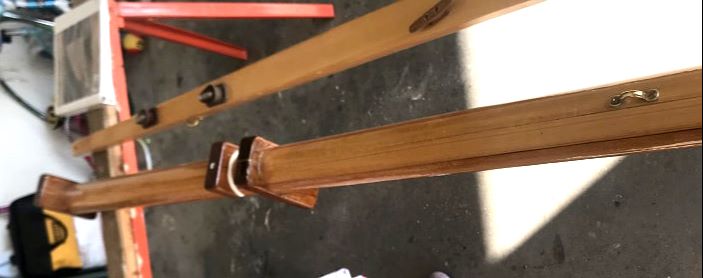
Note the small padeye mounted to the mast with silicon bronze fasteners; this is to attach a short line which will hold the boom up when the sail in lowered. Positioned per plans.
Here is the mast stepped for the first time. I needed to file down the mast blocks a bit with the Shinto rasp in order to get them to fit, so I will need to refinish those filed spots on the mast blocks.
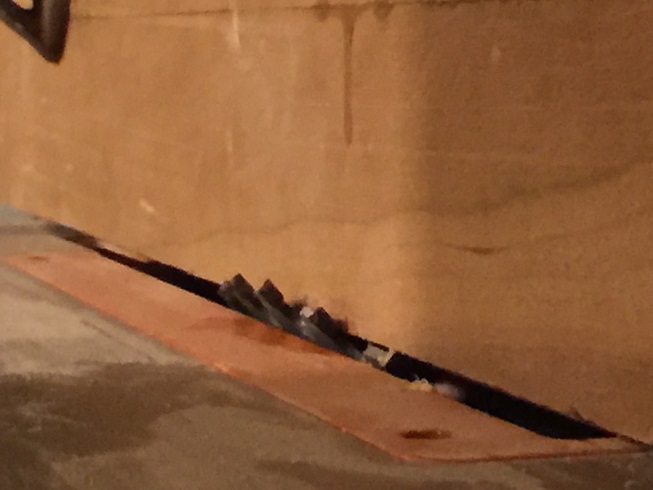
Shiver me timbers!!!! I made a mistake. The upper mast-block on my mast is at the correct location were there no mast step ramp, but it is too high up on the mast due to the existence of a mast stepping ramp that is part of my SCAMP mast trunk. The top of the the upper mast block on my mast is flush with the top of the mast trunk, but the angled mast stepping ramp lowers the aft side of the mast trunk as illustrated below. So, when I stepped my mast for the first time (pictured above), I realized that the mast was loose, because any aft pull on the mast pulled the upper mast-block backwards into the open space that is now the mast stepping ramp. With my upper mast block all nicely epoxied and varnished in-place, I decided to add third compression mast block 31" from the bottom of the mast , which will hold the mast snug against the topmost aft face of the mast trunk, done and dusted and very strong. Were I to build again, I would just locate the top edge of the upper mast block 31" up from the bottom of the mast. My system below is overkill regarding mast-block support-points, but based on how my build progressed, here I am.
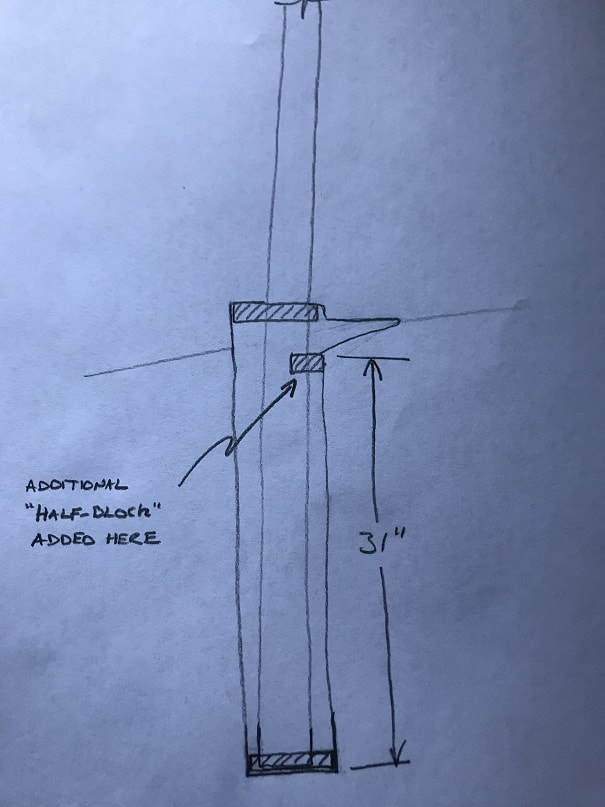
This is the compression mast block that I built and installed to rest against the aft face of the mast trunk just at the bottom of the mast step ramp.